Rules
Rosters and Documentation Rule
| Approved By | Date |
|---|---|
| Executive Leadership Team | 08-21-2023 |
| ICORE | 08-16-2023 |
Curriculum (CU)
Follow these steps to accurately enter grades and attendance in Self-Service for Curriculum Courses.
ONLINE/HYBRID/BLENDED
Steps taken when a course begins:
- Access course sections by clicking on the” Faculty” tab in Self-Service.
- Select the course in which to enter Attendance.
- Access the Roster in Self-Service by clicking the Roster tab.
- Access the census report in Canvas.
- Compare students listed on Class Roster and Census Report. Contact the registrar regarding any discrepancies.
- Click on the Attendance tab.
- Change the date in the “Select Date” drop-down list to the first date in which attendance needs to be entered.
- Select “Present” from the drop-down list in Self-Service when students complete their first academic activity as defined as First Participation (Curr. Present Date) in the Census Report, for online courses. The first academic activity should be based on the common census activity within Canvas. For Hybrid/Blended courses, the Present entry must match whichever component the student attended/participated in first. An “Absent” attendance type should be entered when a student is absent from the scheduled meeting date.
- Select “Never Attend” in Grading, on the Final Grade tab in Self-Service if students do not complete an activity on or by the census date.
- For hybrid or blended classes, if the student attends either or both components (online/seated), he/she should NOT be marked “Never Attend”. He/she should only be marked “Never Attend” if the student has not participated in either component.
- Once a “Never Attend” is indicated in Grading, the Student Records Department will drop the student from the class.
- Certify census attendance by clicking the Census tab in Self-Service and then click the blue Certify button.
- Check Class Roster daily during drop/add period for drops/adds and compare with Census Report in Canvas.
- Compare Class Roster and Census Report again after deletes for non-payment are completed.
- Present attendance type, Never Attends, and Census Certifications are due within 24 hours of the census date.
Steps taken during course when student withdraws (NOTE: Dual enrolled students (CCP and Early College) may be impacted differently by withdrawals. Instructors should contact the Director of Dual-Enrollment Programs prior to issuing a W for dual enrolled students):
- Access Census Report in Canvas.
- Access course sections by clicking on the “Faculty” tab in Self-Service.
- Select the course in which to enter “W” grades. Click on the Grading tab then Final Grade tab.
- Enter a last date of attendance in Grading in Self-service for when students complete their last academic activity as defined as Last Participation (Curr. LDA Date) in the Census Report.
- For Hybrid/Blended courses, the last date of attendance must match whichever component the student last attended/participated.
- For online instruction/components, a student’s last academic activity may be housed within a third-party software or website. Faculty should save documentation of student’s last academic activity dates in third-party sites through a screenshot or downloaded data.
- Select “W” grade from the Final Grade drop-down list. Click the Post Grades button.
Steps taken when course ends:
- Access course sections by clicking on the “Faculty” tab in Self-Service.
- Select the course in which to enter grades.
- For any student that is withdrawing or has failed the course, enter a last date of attendance in Gading for when students complete their last academic activity as defined as Last Participation (Curr. LDA Date) in the Census Report. For Hybrid/Blended courses, the last date of attendance must match whichever component the student last attended/participated.
- For online instruction/components, a student’s last academic activity may be housed within a third-party software or website. Faculty should save documentation of student’s last academic activity dates in third-party sites through a screenshot or downloaded data.
- Enter all grades by selecting the appropriate grade from the final grade drop-down list.
- Click the Post Grades button.
- Grades are due within 24 hours of the class end date.
TRADITIONAL SEATED COURSES
Steps taken when a course begins:
- Access course sections by clicking on the “Faculty” tab in Self-Service.
- Access the course Class Roster in Self-Service. Contact the registrar regarding any discrepancies.
- Select the course in which to enter the Attendance Entry page. Click on the Attendance tab.
- Change the date in the “Select Date” drop-down to the first date in which attendance needs to be entered.
- Enter a Present attendance Type for when students last attended each seated portion. There may be more than one different component containing meeting dates for some courses. If so, all components need a Present attendance type entered.
- An “Absent” attendance type should be entered when a student is absent from the scheduled meeting date.
- Select “Never Attend” in Grading on the Final Grade tab in Self-Service if students do not attend on or by the census date.
- Once “Never Attend” is indicated in Grading, the Student Records Department will drop the student from the class.
- Certify census attendance by clicking the Census tab in Self-Service and then click the blue Certify button.
- Check Class Roster daily during drop/add period for drops/adds.
- Compare Class Roster again after deletes for non-payment are completed.
- Present attendance type, Never Attends, and Census Certifications are due within 24 hours of the census date.
Steps taken during course when student withdraws:
- Access course sections by clicking on the “Faculty” tab in Self-Service.
- Select the course in which to enter “W” grades. Click on the Grading tab then Final Grade tab.
- Enter an “L last date of attendance” in Grading in Self-Service for when students last attended the course. For courses with multiple components, the student could have a different last date of attendance for each component. In this instance, you will need to use the latest date on which the student attended as their last date of attendance.
- Select “W” grade from the Final Grade drop-down list. Click the Post Grades button.
Steps taken when course ends:
- Access course sections by clicking on the “Faculty” tab in Self-Service.
- Select the course in which to enter grades.
- For any student that is withdrawing or has failed the course, enter a “last date of attendance” in Grading in Self-Service for when students last attended the course. For courses with multiple components, the student could have a different last date of attendance for each component. In this instance, you will need to use the latest date on which the student attended as their last date of attendance.
- Enter all grades by selecting the appropriate grade from the final grade drop-down list.
- Click the Post Grades button.
- Grades are due within 24 hours of the class end date.
CONTINUING EDUCATION (CE)
Follow these steps to record attendance and grades for Non-CCR Occupational Extension CE courses using the paper attendance roster process:
A roster (attendance sheet) will be created by department staff and submitted to instructor(s) of record. The Lead instructor is responsible for verifying and reporting accurate attendance.
- Enter an [E] on the first day/date that the student attended (entered) the class. For initial entry using a virtual method, enter an [E] on the date that the student first participated in the class as documented by the Learning Management System (Canvas) census reports. LMS (Canvas) census reports must be printed and accompany the course roster.
- Subsequent attendance after the student’s first day may be reported with a [🗸] check mark.
- A student absence following initial entry may be marked with an [A].
- For deleted/dropped students, strike through the student’s name on the class roster. Grades are not assigned for deleted/dropped students. For students who are withdrawn after the census date, enter an [W] on the date the student withdrew and assign a U grade on the roster.
- Section amendments including changes to hours, dates, or meetings, etc. should be communicated to the CE Coordinator/staff member managing the course for appropriate updates to the section. The roster must be updated to align with the course section changes.
- Grades for each student are documented on the attendance roster per the CE Grade Policy for subsequent entry by department staff. Additional paperwork is required for any Incomplete [I] grade that is issued as detailed in the Grade Policy pertaining to Incomplete grade assignment.
- Clinical component classes: Any student requiring an extension beyond the course end date to complete clinical hours due to clinical site scheduling assignments should be issued an Incomplete [I] grade for the class. Rosters affected by individual student extensions may be promptly submitted following the course end date and the grade change form shall be used to document the clinical hours completed after the end date of the class.
- The Lead Instructor(s) must sign the roster to verify all attendance information is accurate following the completion of the class. For multi-page rosters, each page must be signed. Rosters that are submitted electronically via scan/email must be sent in accordance with the SCC Electronic Signature policy.
- Any corrections or amendments to information on the roster are allowed by crossing through/correcting in pen or pencil. Correction fluid/tape is not allowed.
- The attendance roster and supporting documentation should be submitted to the department’s CE Coordinator or staff within 48 hours following the end date of the class.
No-Show, Administrative Drops, Withdrawals:
- A student who has never attended class is considered a no-show. A no-show student should be administratively dropped by staff using a CE Drop/Withdrawal/Change form submitted to the appropriate CE Coordinator or staff member for processing and forwarded to the Student Records Department for verification.
- NOTE: For 100% virtual classes, any student who has not participated in the class by the census date should be dropped as a no-show. Notify the CE Coordinator to submit a drop form to the Student Records Department for processing/verification.
- Students may also be administratively dropped by college staff. Drop requests for administrative drops should be submitted to the Student Records Department for verification/processing.
Tuition/Fee Waived Eligible CE Courses – Additional Requirements
Classes offered to Authorized Groups and Organizations that are eligible to receive a Tuition/Registration Fee waiver must include additional documentation in compliance with the Tuition and Registration Fee Waiver guidance. (For CE, this usually pertains to Public Safety course subjects.)
- Rosters may be created that include fields for students to indicate their respective Agency Affiliation, Job/Role Classification and Signature attesting eligibility to receive the appropriate fee waiver discount. These rosters must include a statement indicating that the student’s signature attests that eligibility requirements have been met.Example of Attestation Statement on the roster: “My signature attests that I am actively affiliated with a Tuition/Fee Waived agency as listed below and I hold the job classification indicated.”
- Instructors/CE Course Coordinators must ensure that each participating student who is eligible to receive a Tuition/Fee waiver discount has indicated their Agency and Job/Role Classification with their signature via one of the following methods:
- Student’s signature with their Agency and Job/Role classification documented on the class roster.
- A signed registration form with the Agency & Job/Role section completed.
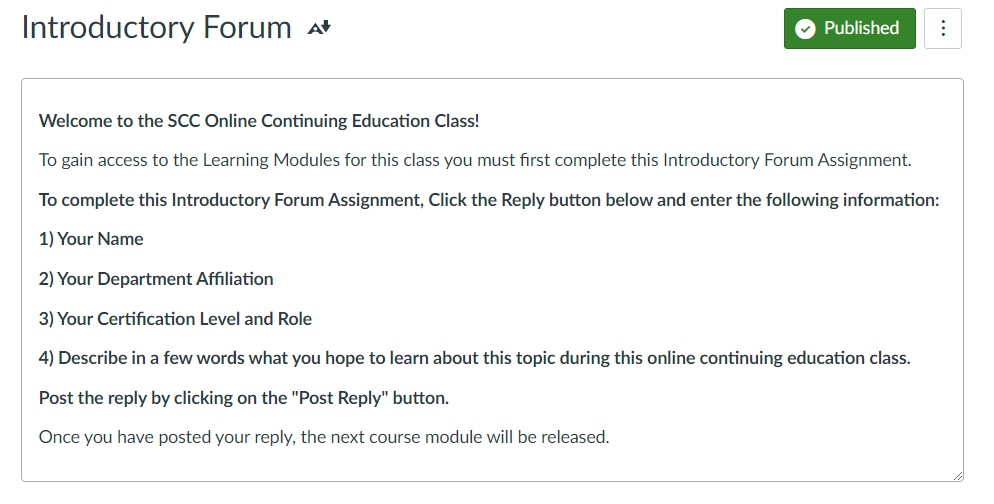
- Completion of a required Introductory Forum Assignment in the college’s Learning Management System (Canvas) for 100% virtual classes. The Introductory Forum assignment must indicate their Name, Department Affiliation, and Role. This assignment documentation must be printed and accompany the course roster. Student login credentials serve as the student’s signature to self-attest eligibility.
- Example of Introductory Forum Assignment in Canvas:
- Students who have not provided required eligibility attestation may be administratively dropped from the class.
Closing CE Class Files
- CE Class Files should be reviewed for all required elements by the CE Coordinator or Staff member managing the course. Any required amendments should be documented on the class roster and/or with change memos. Grades assigned on the roster from the instructor(s) should be entered into the student information system and verified by the CE Coordinator/Staff member managing the course.
- CE Class Files should include the following elements:
- Signed class roster (attendance sheet) with correct course information. For multi-page rosters, the instructor’s signature must be included on all pages and the correct course information must be reflected on all pages.
- Signed instructor payment contract(s) documenting accurate course information. All reported course hours should be covered by instructor hours.
- Printed Grade Roster (GROS) from Colleague documenting the students and hours that will be reported for FTE.
- Printed ‘Charges and Balances’ Informer report documenting each student’s proof of payment or fee waiver discount received.
- Any other documentation that is required to support the class or class roster including:
- Course planning sheet(s).
- Change memo(s).
- Signed registration forms attesting fee waiver eligibility discounts.
- Census reports from the LMS documenting course entry dates.
- Introductory Forum assignments from the LMS documenting fee waiver eligibility discounts.
- Other documentation as needed or required.
- Class rosters for Blended, Hybrid, and Clinical courses must also include the hours breakdown between these multiple methods of instruction. A Blended or Hybrid course should reflect the number of instruction hours that were taught respectively as traditional seated (f2f) and virtually. For any course including a clinical component, the number of hours taught as clinical hours should also be reflected. Review of the instructional hours should be performed to determine that the correct location has been assigned for reporting.
- Completed and closed CE class files should be submitted to the Student Records Department within two weeks following the course end date. For courses ending near to the end of term, expedited submission within one week of the course end date is requested to allow for review prior to end of term state reporting.
HUMAN RESOURCES DEVELOPMENT (HRD)
Follow these steps to record attendance in Self Service for HRD:
Use SCC credentials to Log in to Self Service
For MEMBERSHIP classes entering attendance and grades:
- Census: the first 10% of the class. No additional students enter a course after the census date.
- ONLY use “P” (Present) or “A” (Absent). P and A represent the full amount of class hours for the day (Ex. If the class lasts 3 hours, the P or A count for 3 hours)
- Do not enter any “time” in Self Service – ONLY “P” or “A” to show if student was there or not.
- How long the student stays in the class period is not recorded.
- For Membership classes, only gather a signature from student when they arrive and not the “time in” or “time out”.
- Grades
- Earn a “U” (unsatisfactory) for less than 80% attendance
- Earn an “S” (satisfactory) for 80%+ attendance
- Grades are based on attendance and not on assignment grades as HRD is a program of self-improvement courses.
- Total the number of days the student was present (P), multiply that number by how long the class periods were, and divide that number by the total course hours in order to get the attendance percentage. EXAMPLE: Class ran 1:00–4:00 pm (3 hours) for a total of 15 hours on the contract. The student was present (P) for 4 days.
To determine the grade:
4 days X 3 hours/day = 12 hours
12 hours attended / 15 class hours = 0.80 = 80% for present attendance
Grade = 80%; student earns an S (Satisfactory)
- Total the number of days the student was present (P), multiply that number by how long the class periods were, and divide that number by the total course hours in order to get the attendance percentage. EXAMPLE: Class ran 1:00–4:00 pm (3 hours) for a total of 15 hours on the contract. The student was present (P) for 4 days.
- If a student is close to earning an S and the instructor wants to plead a student’s case, they can email the HRD Coordinator telling why they believe the student to be deserving of the S and show proof that the student is deserving.
HRD Coordinator uses their discretion in these cases and keeps documentation reasoning why this decision was made.
For MULTI-ENTRY classes entering attendance and grades:
- Enter the amount of time a student spent in the class for attendance
- Gather a signature from student when they arrive and record their “time in” and “time out” of class
- Grades
- Earn a U (Unsatisfactory) for less than 80% attendance
- Earn an S (Satisfactory) for 80%+ attendance
- Grades are based on attendance and not on assignment grades as HRD is a program of self-improvement courses.
Total the number of hours the student was present and divide that number by the total course hours in order to get the attendance percentage
EXAMPLE: The course ran for a total of 15 hours on the contract. The student was present a total of 10 hours.
To determine the grade:
10 hours attended / 15 class hours = 0.67 = 67% for present attendance
Grade = 67%; student earns a U (Unsatisfactory)
d. If a student is close to earning an S and the instructor wants to plead a student’s case, they can email the HRD Coordinator telling why they believe the student to be deserving of the S and show proof that the student is deserving.
HRD Coordinator uses their discretion in these cases and keeps documentation reasoning why this decision was made.
COLLEGE AND CAREER READINESS (CCR)
Follow these steps to accurately enter attendance in AdvanSys for Adult High School and High School Equivalency Classes for both seated and online classes:
Steps taken to enter attendance in AdvanSys.
- Access the AdvanSys site by entering your log in credentials.
- Click on the Class Management tab.
- Select the Enter Hours tab.
- Enter the name of your class to filter the list.
- Select your class at the bottom of the page.
- Hours for the class should appear. Instructors should never make changes to the class hours.
- Click on “Save Teacher/Class Hours”
- The next page will have a large, red box with text in it at the top. Please ignore it.
- Scroll to the bottom of the red box and keep scrolling until you see a list of students with the “boxes” where you will enter the attendance. See picture below:
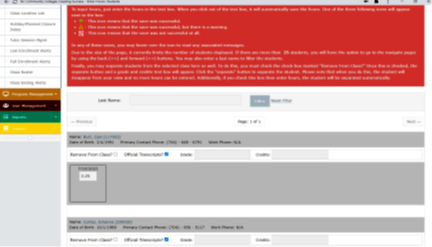
- Enter the attendance hours for each student.
- When you enter the attendance in each box, you will see a small green flag appear. This means you have entered the time correctly and it is now ready to be approved.
To Check Student Attendance
- Click on the student management tab.
- Click the “Look up and Add New Student” tab.
- Under the student photo icon, please click on “Attendance Hours.”
- The page will show the entire attendance record for the student.
- The dates with green check marks have been through the approval process and cannot be changed.
- The dates with the red x marks have not approved and may still be changed.
- Once attendance has been approved, it cannot be changed.
Grading Students in AdvanSys
- Go to “Enter Hours” under the Class Management tab.
- On the class schedule page, change the date range on the class section to reflect the start and end dates of the class.
- Click on the box for “Remove from Class” -you will now be able to type in the grade field and enter credits (if applicable).
- Click “Separate”
- Once all students have been graded and separated, close the class section in AdvanSys.
- Print the Class Attendance Report for the state compliance file and have the “teacher of record” sign and date the final class atte